
canonical_url: https://www.ravsam.in/blog/deploy-a-serverless-probot-github-app-on-netlify-functions/ date: 2021-04-27 06:04:17 UTC published: true tags: automation,githubbot,netlify,serverless title: Deploy a Serverless Probot/Github App on Netlify Functions
Build and Deploy a Serverless Probot or Github App on Netlify Functions to automate your Github and achieve infinite scalability.
This blog was originally published on RavSam’s blog. We publish our articles on Medium after a week.
Automation is love. We all love automating repetitive things. There is one such thing called Probot. Probot is one of the most popular frameworks for developing GitHub Apps using Javascript. It is easy to set up as most of the things like setting up authentication, registering webhooks, managing permissions, are all handled by Probot itself. We just need to write our code for sending responses to different events.
In this article, we will learn how to build and deploy a serverless bot to Netlify Functions. The advantage of using Netlify Functions is that it is free for up to 125,000 requests per month which are more than enough for a small startup or organization.
Contents
- Prerequisites
- Writing Application Logic
- Deploying on Netlify Functions
- Updating Webhook URL
- Results
Prerequisites
We can follow this guide on how to set up Probot.
1. Writing Application Logic
Once our Probot is set up, we need to do some changes to our directory structure to deploy it to Netlify Functions.
Let us create a src directory and put our application logic in a new file, app.js:
/**
 * This is the main entrypoint to your Probot app
 * @param {import('probot').Probot} app
 */

module.exports = (app) => {
  app.log.info('App has loaded');
  app.on('issues.opened', async (context) => {
    context.octokit.issues.createComment(
      context.issue({
        body: 'Thanks for opening this issue!',
      })
    );
  });
};
The above code is really simple. Whenever a new issue is opened, it creates an issue comment thanking the issue author.
Netlify Functions are AWS Lambda functions but their deployment to AWS is handled by Netlify. For deploying our Probot on Netlify, we can use AWS Lambda adapter for Probot.
npm install @probot/adapter-aws-lambda-serverless --saveThe next thing we need to do is to create a functions directory that will be used by Netlify to deploy our serverless functions. Every JS file in the functions directory is deployed as an individual function that can be accessed via
In functions directory, let us create a index.js file and add the following code:
const { createLambdaFunction, createProbot } = require('@probot/adapter-aws-lambda-serverless');

const app = require('../src/app');

module.exports.handler = createLambdaFunction(app, {
  probot: createProbot(),
});
Our code is finally done and the next step is to deploy our application to Netlify.
2. Deploying on Netlify Functions
Before proceeding with setup for deployment, we need to address some issues. We need to create a configuration file, netlify.toml at the root of the project and tell some important things for Netlify to consider when deploying our bot.
Let us add the following content in netlify.toml:
[build]
command = "npm install --production"
functions = "./functions"
We are telling Netlify to run npm install before deploying our functions which are present in the functions directory.
To deploy on Netlify, we can use Netlify Dev. For that, we need to install netlify-cli by doing:
npm install netlify-cli -gLet us now login to our Netlify account by doing:
netlify loginOnce we are logged in, let us connect our current directory to Netlify Functions. We can either connect to an existing one or create a new one by doing:
netlify initOnce our site is connected, we can build our site locally and deploy it to Netlify by doing:
netlify build
netlify deploy --prod
We can also connect our Github Repository to our Netlify project or use Github Actions to deploy our bot to Netlify. {.alert alert-info}
3. Updating Webhook URL
Once our Probot is deployed, we need to update the Webhook URL to tell Github where to send the event payloads. We can visit https://github.com/settings/apps/
Results
Let us test our bot by creating an issue on a repository where we installed our Github app and see whether our bot responds back or not.
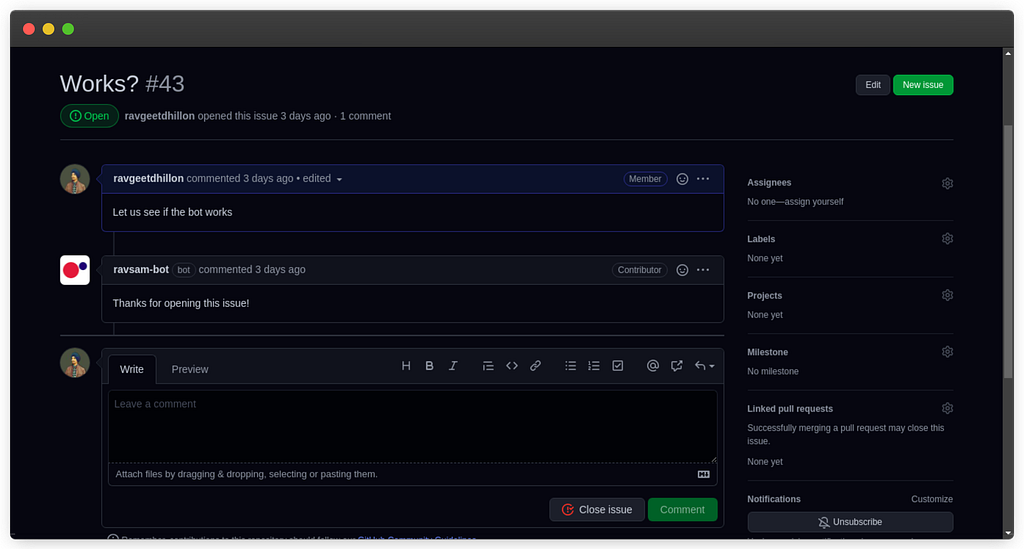
Awesome! We can see that our bot welcomed us with a message that we wrote earlier. There are many things to automate on Github like auto assigning users to the issues, auto assigning reviewers to a pull request, auto merging pull requests created by dependabot alerts and much more.
👉 Follow me for upcoming articles.
Connect with Me
I love writing for the community while working on my freelance and open source projects. Connect with me through Twitter • LinkedIn • Github • Email.
About RavSam Web Solutions
Looking for a Web Design company to build your next project? We welcome you. Reach out to us to know more about our website development services, or anything else. We are always looking forward to work on great ideas. If you are looking for an application development company, you are most welcome to get in touch with us.
You might also enjoy reading
I share tips on how to get started with freelancing, remote jobs, developer-related stuff, startup ecosystem, and lots of insider secrets with my subscribers.